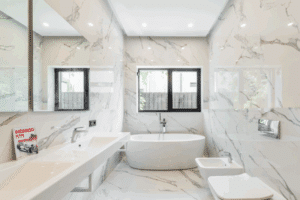
Thinking about upgrading your bathroom with sleek, modern tile? This gauged porcelain shower installation guide will show you how to work with large-format porcelain panels step by step.. Whether you’re a DIY enthusiast or working with a pro, understanding the steps of a gauged porcelain shower installation guide can help you avoid costly mistakes and achieve a stunning result. Installing gauged porcelain panels requires precision, but with the right prep and process, it’s doable.
What Is Gauged Porcelain and Why Use It?

Gauged porcelain tiles are large-format, thin porcelain panels designed for walls and floors. They offer a clean, seamless look with fewer grout lines, perfect for modern shower designs. These tiles are strong, lightweight, and water-resistant, making them ideal for shower installations. Plus, they mimic the look of stone or concrete without the weight or maintenance.
Tools and Materials You’ll Need
Before you begin, gather these tools and supplies:
- Large gauged porcelain tile panels
- Tile leveling system
- Notched trowel (appropriate size for large-format tiles)
- Thinset mortar (approved for gauged porcelain)
- A tile cutter or a wet saw for large panels
- Suction cup lifters
- Tile spacers
- Grout and sealant
- Protective gloves and knee pads
Tip: Always follow the panel manufacturer’s instructions for approved adhesives and cutting tools.
1. Prep the Shower Walls
Make sure your shower walls are flat, clean, dry, and properly waterproofed with a method like waterproofing a shower before tiling, as effective shower waterproofing methods help prevent moisture issues. Use a level to check for any uneven spots.
2. Measure and Dry-Fit the Panels
Measure twice, cut once! Dry-fitting helps you visualize the layout and identify tricky cuts ahead of time, especially around fixtures or niches.
This also gives you a chance to balance the design so grout lines fall in the most visually appealing spots. Make adjustments now rather than mid-installation.
3. Apply Thinset Mortar
Use a large notched trowel to apply thinset mortar evenly to the wall and the back of each panel (this is called back buttering). This ensures a strong bond.
Choose a mortar rated for large-format gauged porcelain tile. Working in small sections helps prevent the mortar from drying out before panel placement.
4. Set the Gauged Porcelain Panels
Carefully lift the panel using suction cup lifters and press it into place. Use a tile leveling system for showers to keep lines straight and eliminate lippage (uneven edges between tiles).
Apply gentle pressure across the entire panel to remove air pockets. Start from the bottom row and work your way up for the best alignment.
5. Let It Cure
Allow the adhesive to set per the product’s instructions, usually 24 hours. Avoid using the shower during this time.
Keep the room temperature stable and avoid any movement or pressure on the tiles. Rushing this step can lead to poor adhesion or tile shifting.
6. Grout and Seal
Once the tiles are set, fill in the joints with grout. Clean off excess grout and seal any necessary areas to protect against moisture.
Use a non-sanded grout for smaller joints, and make sure to select a waterproof grout for showers. Once dry, apply a sealant to maintain durability and prevent mildew.
Common Mistakes to Avoid
- Skipping wall prep: Uneven walls will ruin the installation.
- Using the wrong adhesive: Not all mortars are made for gauged porcelain.
- Not using a leveling system: This tool is key to a flawless finish.
- Rushing the cure time: Give the adhesive time to fully bond before grouting.
Safety Tips for Handling Gauged Porcelain Panels
Gauged porcelain panels are large, thin, and surprisingly heavy, making them tricky to handle, especially in tight bathroom spaces. To prevent injury and avoid cracking a panel, take proper safety precautions before and during installation.
- Always use suction cup lifters to move and position panels; never lift with bare hands.
- Wear cut-resistant gloves and protective eyewear to shield against chips or sharp edges.
- Work with a partner when placing large panels to maintain balance and prevent tipping.
- Lay panels flat during staging to prevent bending or warping.
- Use a clean, padded surface when cutting or prepping tiles to reduce the risk of cracks.
A little caution goes a long way. Safety gear and teamwork can save you from costly breaks or painful accidents.
Project Time & Skill Level
Installing gauged porcelain panels is not your typical tile project. These large-format tiles require careful planning, precise cuts, and steady hands, so it’s important to know what to expect before diving in.
Estimated Time:
- 1 day for surface prep
- 1 day for setting panels
- 1 day for curing, grouting, and sealing
(Approximately 2–3 days total, depending on experience and shower size)
Skill Level:
- Advanced DIY or Professional Recommended
This project is best suited for experienced tile setters or confident DIYers with prior tiling experience. If you’re unsure, consult a local tile installer familiar with large-format tile work.
When to Hire a Professional
Installing gauged porcelain is more technical than standard tile. If you’re unsure or don’t have the right tools, hiring a certified tile installer, especially one familiar with large-format tile, is a smart move. This ensures safety, quality, and durability, especially in a moisture-heavy area like a shower.
Conclusion
Upgrading your shower with gauged porcelain panels can transform the look and feel of your bathroom. This guide walked you through each step from prep and planning to setting panels and sealing them for long-lasting beauty. While the process takes time and care, the sleek, modern result is well worth the effort. You can also remove stains to keep your shower looking pristine.
If you’re unsure about any part of the installation, don’t hesitate to ask a local tile professional for help. A bit of expert guidance can make all the difference in achieving a clean, safe, and stunning finish.

